Saturday, 27 April 2013

The Overlocker - not just a pretty face!

I attended THE. MOST. AMAZING.  WORKSHOP. EVER at my local sewing guild!! The Overlocker (aka serger) workshop.

It was FABO...

I did have a wonderful video of me doing the happy dance taken by the fabulous Velosewer in her directorial debut - but I can't get it to work when uploaded - works fine on my PC and phone but - alas - doesn't seem to want to go into the bloggershere.

The workshop covered the basics of tension which is a need to know but not overly exciting... sort of like learning how to sew a straight line on a regular machine - functional and absolutely necessary to go forward - but doesn't make the heart flutter!

We then learnt how to do outer and inner corners neatly - yeah - fantastic - absolutely need to know - great info and techniques.. Believe me - this is something I have struggled with.

How good is that (sorry Velosewer - didn't mean to steal your tag) inner serged corner??? Even if I do say so myself!! Okay - I may have come off the edge a bit and the lower looper thread is showing too much - but hey - you should have seen my attempts before!

We learnt how to gather without using a special foot and to do a really nice neat rolled hem. Love the stitching on that.

I was frilled with the outcome

Close up of rolled hem

Then came the sewing with "decorative" thread. WOW WOW WOW.

How gorgeous is this.


Pretty - three thread overlocked
Rolled hem

We learnt to make decorative cord. Learnt great techniques such as using soluble vilene so that the stitches don't "jump" when making cord.

Cord without stabilisation 

Creating cord using wash away stabiliser 
AND - how to do a lacy edge


So much to take in - so little time. Having a brain spin at the moment - oh so giddy!

All in all - most pleased with self!!

Big thanks to Larraine Jenkins who taught this workshop. She is a great teacher and had wonderful typed up notes for us too!

Can't wait to start using these techniques.

Velosewer  has instructions for some of these techniques on her site.

Monday, 22 April 2013

Hot off the press - Another McCalls 2401

Here is my latest McCalls 2401.

This is the V-Neck version and I am happy with it.

I finished pressing it last night and wore it to work today. I trained in the beautiful and prestigious Art Deco hotel -  The Grace - in the Sydney CBD today and I felt good enough in this Made By Me dress to wear to The Grace. (Cardi is RTW).


Excuse the grumpy face - I was tired.


Here is the dress sans cardi. I always wear something over my arms in public.


I don't think the flash went off in the above - had to lighten it considerably. Excuse ugly bruise on leg - I dropped the vacuum cleaner on myself  ... that's what happens when you try to clean!

I love this fabric - it is a tribal print - quite thick knit (but not as thick as the last brown dress) from Sawyer Brooks. It was originally going to be a Pamela's Pattern's T-Shirt but I had enough for a dress and Voila - here it is. Sad thing is - the fabric looks like it is going to pill easily - damn!


Here is a close up of neck line:


Happy with results. Next one will have sleeves. Not much more to add.

This is my next item for the Sew Your Own Wardrobe for a Year Challenge

Please indulge me while I will leave you with a few gratuitous pictures of "The Grace". She is beautiful and I love going there.

The Beautiful Foyer


Where I eat Lunch


Where I teach


She is special


Photos from the Grace Hotel Website.

Tuesday, 16 April 2013

StyleArc Marni Ponti Jacket - The Redemption - and the next McCalls 2401

Well - I am NOW one happy chook and back in love with "Marni".

The happy dance has returned.


I have stretched my skills - had some major downs but am pleased with the results. There is room for improvement but - for a first go - okay.


Still have to work out the closure so I am holding it closed.

There are a few "home made" errors that I can see but I will wear it happily.

I can't believe how well it went together - especially as I have added a bit to the pattern (all the dramas were major user error).

StyleArc patterns only allow you to purchase one size, so I chose one a couple of sizes smaller than my size (for shoulder fitting) and added an inch to the sides (which would be four inches added to chest and waist area.

I made the sleeves shorter (again user error) - but I am happy with the look of the cuffs at the end rather than folded up.

I also added a bit to the seam allowance as StyleArc only have minimal seam allowance and I read the review by Margy who said a thicker knit was difficult to get the seams to lay flat with the 3/8 inch seam allowance so I added enough to bring it up to 5/8 inch. Recommendation to anyone buying this pattern. If you are going to do it in a thicker knit and cut a more generous seam allowance - do it when cutting out the paper for the pattern I cut the pattern first and then tried to remember to cut the more generous allowance when cutting the fabric.

I also used a lot of  (well actually all of) the hints and tips on PattyE's review. There was some really great advice there complimented by several construction photos.

I really couldn't have done this jacket without the help of these lovely ladies. StyleArc do not have great instructions and I did struggle with some of them. Glad to have had read these reviews on PR.

The only problem with the pattern is that it asks you to cut 2 pairs of cuffs. But only one pair is used.

Apart from the above changes - I did nothing else. I didn't lower the bust point as I normally do. I think it looks okay where it is.

I didn't lengthen the pattern at all. I think it all hits where it should. If I were to make one to wear with trousers I would make it longer but for a dress it is good.

I did add shoulder pads.

Overall - even though I struggled with my errors, I really love this pattern. I am already planning another.

What I have learnt:
  • How to do a Shawl Collar in knit
  • To check all positioning and that fabric and pieces are the right way up before sewing
  • How to do a split cuff
  • How to cover and attach shoulder pads (not included in pattern)
  • How to do a pleat and line it up (well almost line it up - that is one of my "errors" - user, not pattern error. But I did learn from it so I have included in list.
  • How to sew a knit JACKET!!! Woo hoo - my first jacket. Okay okay - it is not a lined jacket with notched collar, pockets and lots of buttons etc - but it is a jacket and I am happy.
  • Did I mention to check positions and sides of pattern before sewing!!!
Still need to work out the "closure" on the jacket. Bit afraid of doing a buttonhole in case I stuff it up.

Also featured in this week's line up is my latest incarnation of McCalls 2401.


I ended up with enough fabric for a dress and I am very happy with this version.

Keep in mind that the new dress is in a MUCH thicker fabric and also a thickish (tricot) lining so it is showing as a little tighter (read clingy) than the last version and it hangs a little different. I will keep this in mind for future dresses.

I was going to split the difference between the shorter version and the longer version of the dress but on advice of most commentators I bit the bullet and cut the inch off the pattern itself - hence making it shorter. I have bowed to the wisdom of the many.

I also pegged it in about half an inch on each side (2 inches in all).

In addition I added a bit of a higher back neckline and shaved an inch off the front neckline.


 Here it is in comparison to last.

If I do another scoop neck I will scoop it out even more - my next version will be a v-neck.


Higher back.

I didn't do a v-neck for this version as I am playing with the thought of a little bit of embroidery along the neckline.

I thought that before I did the pattern alteration that Carolyn advised to remove the gaping neckline, I would try and see how the lower neckline dealt with it as it only seemed to gape up high. It seemed to work. Thanks to Carolyn for the advice.

I added a tricot lining as the ponte is very thick - almost like a wool - and hence a little scratchy on my delicate skin. I top stitched the neckline and armholes.

This is how it all looks together - along with the lovely purse sent to me by Anne at Pretty Grievances. I think the gold of the purse looks lovely with the brown. I have added reptile like shoes to complete the animal accessories.


I am really liking the look of the "suit" HOWEVER....... I didn't figure into the equation the thickness of the fabric when I made it. I was so impressed by the quality of the ponte that I immediately thought of this suit.. I am thinking I will have to move to Tassy to be able to wear it. It doesn't get that cold here in Sydney and I tend to run a few degrees hotter than most people as it is. Wearing the dress and jacket together makes me feel like I am in a furnace. May feel different in the depths of winter but I doubt it. My summer and winter wardrobe usually only changes with the addition of a cardi.

Oh well - they will be good as separates.

A close up of the lovely purse. Hard to catch with the flash - it is a gorgeous gold and brown on a black background. Thanks Anne.

.


I have great plans for my TNT - I promised myself I wouldn't plan anymore. My plans seem to always come to naught. My recent sign up for the Artisan's Square SWAP is one such failed plan. Life got in the way and then I became infatuated with the TNT and my first (knit) jacket.

This plan is not a date driven one - it is just what fabric I want to use to create more dresses.


One plan I am following is the "sew your own wardrobe for a year" challenge. Vita and Natalea are hosting this challenge - to shun RTW and make it yourself. This Marni Jacket and the 2401 are my first items for this challenge.

You can read all about it here.

Hope your sewing is going well.

Sunday, 7 April 2013

StyleArc Marni Ponti Jacket - Progress

Firstly - let me say a HUGE thank you to all of those who have given me advice on my TNAT pattern. It is greatly appreciated. It is always great to get another perspective and I really respect the advice.

Thanking you all
Overwhelmingly the vote was for the shorter length - with just a couple of dissenting views. It's funny, I look at it and even after so many people have said the shorter looks better, I think the longer looks more "lady like" (and when did I become a  prude - or a lady for that matter??? Maybe it was when I turned 50! - after all - the shorter version is hardly a mini skirt - only an inch shorter). I am going to try splitting the difference and trying just a smidge shorter first. 

I may also take the approach of lighter / more casual fabric shorter, heavier or more sophisticated fabric the longer length. I have some gorgeous fabrics that are just screaming to be made into that pattern. I am definitely going to peg it in a little as advised.

I also had some feedback on doing a V-neck and I totally think this is a great idea. I am a little "afraid" of the v-neck. Easy to do as a cross over - but will have to try out the straight V-neck.

Now to current sewing news:


I don't normally do progress reports. Mainly because I guess my past sewing has been quick and also I haven't been this discouraged before.

I am one unhappy chook.

Nothing to do with the pattern - I actually really like the way the pattern is coming together. No - unfortunately this is pure user error - compounded by more user error - and then yet more.

User has now crashed and refuses to work anymore today.

Yesterday I was so happy with my progress I was doing the happy dance around the house.

Now I sit here dejected - if I had a glass of wine I would be crying into it. Instead I am venting my spleen on the computer in the chance that if I ever sew again I will read this and remember my mistakes.

Here is the "torso".

So far so good. Happy with the look and how it is coming together.


The shiny irony patches don't show up in life. The flash has picked them up. Proof however that I do press as I sew. Note to self - use ironing cloth in future.

Fit is good on me.

So - what is the problem I hear you ask?

Well - let me give you a bit of background.

As you have to choose one size with StyleArc, I chose a size a couple down from my size and added an inch  to the sides - which adds 4 inches of - well let's call it "volume".

Problem is - I forgot to add the inch to the sides of the sleeves - so they were too small for the armhole.

No biggie - I purchased plenty of fabric - enough for a matching dress and "wriggle room"..

I cut myself some more sleeves and sat down to sew.

All looking good.

Smile still on face - no longer dancing around the place in joy but humming to self whilst Dog Whisperer is on in background (don't know why - don't have dog - do like Cesare Milan's techniques though - but it don't work on cats - *sigh*).

First step - sew cuffs. A bit tricky but because of the review from PattiE on PR I worked it out.

Cool - looking good.

Attach sleeve to cuff. Great job - fit nicely.. Turn right side out.

DOH - attached so that seam allowance of cuff is on outside of sleeve. See nicely pressed sleeve seam at bottom of picture.


Oh well - a bit of time to be spent with stitch picker - still smiling - no longer humming - Cesare Milan is espousing "Calm Assertiveness" - I can do that - I can be calm and assert myself on the sleeve.

Cuff now unpicked and stitched properly to sleeve - all good.

Sew second sleeve and cuff. Looks good - Trim excess seam allowance to reduce bulk - iron nicely.

Pull sleeve up arm to look - split on cuff on INSIDE of arm.... DOH DOH DOH.

No longer smiling! Cesare raving on about perseverance and patience, harmony and balance - Aargh!! Cesare is starting to SH*T me. Switch Cesare off and put on DVD of 24. Terrorists, torture and Jack Bauer to save us all. Much better. (I wonder if Jack can sew - he saves the day everywhere else - why not in the sewing room - Hey great idea for a show - "Sewing Rescue" go into the homes of sewists like me and save their sanity -- hmm -- but I digress.).

Take deep breath and go and cut new sleeve and cuff - more fabric used up. Starting to think short may be the only available length for brown dress.

CAREFULLY sew sleeve and cuff. Take another deep breath. Looks good. Iron, try on arm. All good. Edges of lips start to twitch.

Now have 2 sleeves with cuffs.

CAREFULLY pin sleeve to jacket - check notches match. Attach sleeve to jacket.

Sleeve fits nice into armhole. Sews up beautifully - no cap ease worries at all. Edge of lips twitch a bit more.

Iron seam allowances flat.

Pull right side out to try on.


Sleeve picked up - shoulder of Marni (pattern) in background. How the Bleep did this happen? The damn sleeve is INSIDE OUT!

Throw Marni on floor and curl into fetal position on couch. Worry that since the notches matched up - does this mean I have sewed the whole sleeve inside out? Will I need to cut more sleeves and cuffs? Dress is getting shorter by the minute. At this rate I will only have enough fabric left for a pair of bike shorts...

Mental picture of self in brown ponte bike shorts makes me laugh out loud. Restores good humour.

Pick Marni off floor - after all - it is not her fault. She is a good pattern. Don't have the energy to unpick and see if I need to cut more fabric.

Marni is now keeping Babs warm until I am ready to face her again. Probably next weekend.  Luckily Babs doesn't have arms. Weird experience of lots of disembodied sleeves floating around the house...


BTW - I shortened the sleeves when cutting this pattern out. I thought that StyleArc must have thought that if you are a larger lady you must have very long arms. After checking PattiE's review to put in the link I realised that the cuff - was exactly that - a cuff to be folded up. Not an end piece of the sleeve - more to think about.

Please - all you great sewists out there - please tell me you have had days like this. Not to depress you but to make me feel less stupid.

Wednesday, 3 April 2013

Plus sized pattern pyramid

If you are stalking the Plus sized pattern pyramid, it is now with:

Megan of The Green Violet 

Go ahead and check it out

Monday, 1 April 2013

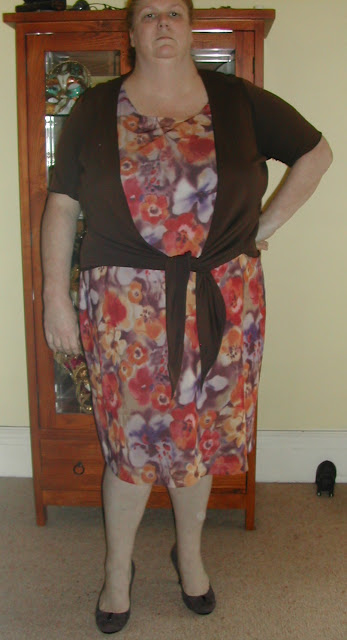
Step 3 to TNT Dress - McCalls 2401 - Picture heavy

Thank you for all the kind comments on my journey to TNT (and about my legs!!). They are greatly appreciated and very motivating. There have also been some great ideas for me to mull over.

- Shortening the length - I have shown later in this post with this version in both the "normal" length and about an inch shorter.
- Having the shrug tied higher - I have shown this too
- Lowering the neckline
- Putting in the front and back darts - I will try this with a woven I think - I will have to work out where they start and stop too.

Thanks for the comments.

So here is the next version. Well - I am happy with this. Almost perfect in my eyes. The one problem is the neckline isn't sitting perfectly - I don't know what this is. I may have to wear it  to my next sewing group and see if the more experienced sewists can tell me. I am calling this TNAT (tried and almost there) As stated in last post - I will need to try it with a woven and with sleeves  before I can breathe a sigh of relief. I also think that I would like to lower the neckline about an inch.

I added a bit of ease to the bust and took off the hip points that didn't show up in the picture of the green dress but believe me they were there.

Couldn't do much with the position of the purple flower - I had a hair's breadth of fabric left over so no room to play. I will always wear it with a cardi or jacket anyway.

I think maybe the back neck needs to come up a bit too.

Don't know what the weird white spot is - there was one on the last lot of pics too.


I am loving this fabric. It is a very stable knit purchased from Vogue Fabrics. It is a different colour version to the blue I purchased to emulate the look of Carolyn's outfit. I didn't make that one first as I wanted to get the TNT done first.

Version 2 and 3 together. There is not much difference to the eye - but the changes were made.


Must get myself a new pose.
After reading the comments on my last post and looking at the green dress more and more, I think I will elevate it from house dress to work dress. Debbie - you are right - being a red haired person of pale skinage - it is a good colour - AND it is in my colour swatches from doing my colours..

Length and shrug comparisons - unfortunately I only ironed and pinned the hem and it dropped in places - but the idea is there.


Although it does show off the legs with the shorter length - I think the longer length balances me out a bit more - what do you think?


Does it ruin the nice shape of the skirt? Or could that be because it isn't hemmed but pinned?


I think tied higher accentuates the girls a little too much for me.


Not too mention the out of proportion upper back.

Good experiment though.

What I have learnt so far during this process:
  1. I do tend to make things too big a lot of the time
  2. How to turn under and coverstitch necklines and armholes - although I think I need a bit more work on this - they are not lying flat. I don't know if it is because I am using Steam a Seam and ironing - maybe that is stretching it.
  3. How to do a back split
  4. The importance of spending time on a pattern to get it right.
  5. Straight skirts are not bad on me (pencil ones don't look any good - I am too top heavy - but straight is good).
  6. What a centre back seam is for. I had always cut on the fold even when it said to cut two. Mainly because my shape - round - doesn't really need a zipper. I even pull jeans up without undoing the zip - so I omit the zip and cut on the fold. Since I was putting in a back spit I needed the seam - and low and behold - I realised the back seam isn't straight anyway (as it is when you cut on the fold) but adds shape to the waist.
  7. Rediscovering my Janome. Since I purchased an overlocker (serger) I tended to try and sew everything on it. Kind of like when you get a dishwasher - if it can't go in the dishwasher - don't use it or buy it Instead of using the Elna Overlocker I have used the Janome DC3050 for these dresses and used a proper seam allowance. I think sometimes things are bigger on me as I wasn't using the seam allowance given in the pattern but skimming it on the overlocker. This was not only giving extra room to the garment but not giving as nice seams as I have found by using my seam roll and pressing open the seam. It really does give it a lovely neat finish. 
  8. I am really happy with the shape of the skirt on this - there have also been a lot of comments supporting this so I am going to trace this off for a skirt pattern too!

What's up next? Another try at TNT?

No. I am going to let it marinate for a bit. However in version 4 I shall:
- bring the back neckline up a bit
- bring the front neckline down a bit
- I might try the square neckline
- I am going to try a *gasp* lined woven with an invisable zip - never done one of those before!!!! Must pull out my Sandra Bezina Zip DVD and see if it helps.
- KC and Louise - I may even tack out some front and / or back darts to see how it goes.

I think my biggest challenge for that one is to work out how to do a lining with a zip and a back slit. I have done a simple lining on my red dress - but I didn't have to attach it to a zip or a split - and of course that invisible zip.

So what will be my next project? I really love the above dress and want to make a brown ponte jacket to go with it. (The shrug is getting worn out). Besides which - I want to replicate the look Carolyn achieved.

I am going to TRY the StyleArc Marni Ponti Jacket. I can hear all the Jedi Masters out there saying - "Do or do not - there is no try" but alas - skill and experience does play a part! It is no use me trying to use the force - I need to use the Janome!


I purchased a whole lot of very good quality brown Japanese Ponte in honour of a beautiful gift sent to me (some time ago) from the amazing Anne from Pretty Grievances. I wanted to show it off to it's best so brought some brown ponte for a dress and jacket. Once I have the jacket done I will make a matching dress out of my TNAT pattern. Then I will show off the lovely pressie. I wanted to get the dress pattern right first.

This is a lot more complex that what I am used to - this will be a real challenge for me..

Wish me luck!