Monday 27 February 2012

Oops - I did it again... fabric flood

I had to work on the weekend so couldn't sew - it has been a busy couple of weeks work wise - but that hasn't stopped me from ordering fabric!! I just can't help myself. Here are my purchases - I had to confess to someone!

I have tried to match some fabrics with each other and with what I have in my stash.

I received some feedback on wardrobe making from Lena Merrin and Belinda (Sew4fun) recommending both grey and tan / mushroom. I loved the idea of mushroom colour dress and as such I purchased the below wool - listed as taupe but I see it as mushroom (may be wrong) .This will go with a lot of the fabric I already have (But then HAD to purchase the embroidered uptown raw silk below it ($3.99 per yard for 100% silk!!!) and one thing led to another and what the h*ll - credit cards were invented for spending!

If you are not interested in seeing copious amounts of pictures of fabric then look no further.

100% lightweight wool

100% raw silk

Chiffon knit

Chiffon - for a wrap / jacket for my red dress

Vintage suede

Crepe De Chine - loved the feel of it so much that I had to buy it in another colour!!!!

As above

Uptown raw silk - 100% silk

Chiffon knit

Stretch moleskin

Uptown 100% raw silk suiting (for a skirt)
Polyester / Lycra Lace

100% lightweight wool

Sweater knit - should also go with red dress!

Double knit

Bemberg Lining

Stretch jersey ITY knit

100% Cotton jersey knit

Rayon jersey knit

Stretch jersey ITY knit

Problem is - they are all so beautiful I won't want to cut them.

I promise myself I WILL NOT BUY ANYMORE!!!

Until next time.

Thursday 23 February 2012

A quick thank you

This post is just a quick thanks for all the positive and encouraging comments left on my post / review of my red dress.

I don't have anyone around me who sews so it really is important to me to get feedback from fellow sewists (and not just members of my family) ;-)

I would also like to take this opportunity to thank all of you who have decided to follow this blog and to welcome new members - it is very humbling.

Next project will be the Pamela's Patterns Magic Pencil Skirt. I want a hopefully quick win and I still need to tweak the red dress pattern shoulders and armholes. Tigergirl - I will let you know if it really is magic - I think it will be for me - I am no where near drafting a pattern myself - even if it is just a straight skirt - I am constantly blown away by the experience you all have out there (very interested in Carolyn's "pattern sandwiching").

Until the skirt is finished (and maybe a top to go with it).

Happy sewing ...

Tuesday 21 February 2012

Simplicity 4014 - The Red Dress


Now I am not normally one who takes bust close ups - but for the sake of info: Close up of strange princess seams and darts.

Well - it is finally done - The red dress is finished! It took a lot longer than I thought it would as I couldn't work out how to attach the lining.

I started out cutting a tiny dress and tiny lining to test out (I am talking doll size) but couldn't get it to work. I tried looking up on the Internet but couldn't find what I wanted for once. There were a lot of tutorials but I couldn't work them out, I was trying to find a video as I am a visual person but could only find text or photos. And still I couldn't work it out. I took days pondering the problem.

I then came across this tutorial from the Green Apples blog of Jessica - the stitchywitch. Green Apples Thanking you Jessica from the bottom of my heart - you saved the day!

At first I just looked at it and said WHAT??? Couldn't work it out and looked again for videos. When I couldn't find a video that showed what I wanted it to, I bit the bullet and followed Jessica's instructions AND IT WORKED!! But then I had to work out how to sew the side seams after the armholes had fabric and lining sewn together. I held the dress up and had a aha moment!

Overall I am pretty pleased with the dress. It is very far from perfect but for my 3rd completed garment - well - I shall wear it. My one real disappointment was that I wanted the seam for the lining to be on the body side so the lining looked like a slip - but once I had sewn the lining to the fabric at the armholes - I couldn't work out how to sew the fabric one way and the lining another.

Thank you also Carolyn from Diary of a Sewing Fanatic for the idea of lace on the lining - something so simple but I didn't think of it until I saw it on Carolyn's blog.


Of course I won't be wearing it as is - I will need a jacket or wrap to hide the arms. It is way too hot for a jacket so I have put on a little wrap to show how I will wear it:


I shall be making some wraps to go with it.

I also used a tip on the Threads DVD for hemming the fabric - First I over locked (serged) the edge of the fabric. I cut a piece of manila folder the width I wanted the hem. I then folded the fabric over the cardboard as I ironed it to get an even width of hem. The threads DVD then calls for you to cut some interfacing on the bias twice the width you want the hem (plus a bit more - can't remember exactly) and then fold it over and sew it on the open end with the "sticky bit" on the outside. This then creates an iron on interfacing "tube". You trim the edge near the stitches and then iron it into your hem with the stitches on the upper side of the hem. This creates a "sewn" hem with an open channel. This is different from your hemming tape as it has an open channel. I was going to do all of this but guess what - Spotlight sell it already done so I bought some and ironed it in. I thought this would give a real professional look to the hem without the stitches showing through. Unfortunately the hem needed a lot of easing in and whilst this is easy enough to do while hand sewing but not easy to do when ironing in hemming tape! I ended up with puckers. It also seems to "stretch" the mmaterial a little. I may try this again when the hem is not A-line. Has anyone had success with this tape?


Using the cardboard to measure hem length


Problems with easing the hem

See post Weekend Planning for pattern adjustments made.

Things I learnt 

1. How to successfully do a FBA and lower a bust line - I consider it successful because all lined up although it may have been even better if I had realised that the seams were not on the apex. YEAH!!

2. How to line a sleeveless dress! (thanks Stitchywitch) YEAH!!!!

3. How to under-stitch the lining to seam allowance to bring the lining inside of the fashion fabric (thanks Stitchywitch)

4. How to do a stitch-less hem. YEAH!!

5. That you really do need ironing aids if you want a great finish. DOH!

6. That you really should overlock (serge) the edges and then straight stitch your seams and iron them open - not just serge the complete seam. DOH!

7. How to add a bit of pizzazz to your lining by adding some lace (thanks Carolyn). YEAH!

8. That I don’t mind sewing darts now that I have learnt how to. YEAH!

9. That the great sewers out there in blogging land are a FANTASTIC source of information and I have learnt heaps from them. YEAH!

10. Sometimes hand-stitching hems are the way to go. DOH!

11. To make sure you really look at the line drawing of a pattern before doing any alterations. DOH!

12. I really need to buy thread for my overlocker that matches my material. I thought that using the fabric colour on the outside needle was enough - but red charmeuse and lace + black stitching = bordello.
Pattern Review


 Pattern Description: Miss or Plus Size Unlined Coat, Jacket and Lined Dress

I used B dress

Pattern Sizing: 10 - 28 in 2 envelopes. I cut the size 28 and did smaller hem allowance and a FBA.

Did it look like the photo/drawing on the pattern envelope once you were done sewing with it? I think so.

Were the instructions easy to follow? Instructions were okay. I didn't follow all of them - no zipper.. I also went looking for instructions on lining on the Internet as I am a pretty visual person and I find one dimensional pictures hard to follow. I found some great instructions from Jessica the Stitchy Witch (thanks heaps!!). This is the first lined garment I have sewed and only the 3rd completed garment I have done ( a couple of UFOs including muslins for the 2 dresses I have made).

What did you particularly like or dislike about the pattern? I like the length and the fit. The overall shape is good too and I like the neckline. Jury is out on the side princess seam and dart. I will wear it a bit and see if I like it.

Fabric Used: Red Wool Blend for the fabric and Red Stretch Charmeuse for the lining. Both from Fabric.com

Pattern alterations or any design changes you made: I didn't put in a zipper, I would probably do this next time as I made it fitted and it does take a bit of tugging (or maybe I just need to lose a kilo or two!!!).  I lowered the bust line by an inch and did a 2 inch full bust adjustment as per instructions from Fit for Real People book. This was done with a few errors as I thought that the princess seams would go over the apex of the bust but they are not supposed to (Pics on my blog). I added lace instead of hemming the lining (as per Carolyn in Diary of a Sewing Fanatic). Next time I will make the armholes a little bigger as they cut just a tiny bit.


Would you sew it again? Would you recommend it to others? I don't know. My original plan was to sew it again but I need to wear it a bit and see how the strangely positioned darts and seams go. I probably would recommend it as I do like the outcome - but be aware that the seams and darts are positioned differently.

Conclusion:  A great learning curve for me but I sure it would be a straightforward and easy to sew dress for those with more experience. Thanks to the bloggers out there in the webosphere whose experiences I learnt from.


Monday 13 February 2012

Babs has arrived!!

Well - here she is. My dress form Barbara - Babs for short. She was only ordered on Friday and here she is! Now that is service! I like the fact that she seams to have a low bust line - I will have to measure to see how much I need to alter but she isn't a "perky" young thing which is good.


I have called her Barbara as I get called Barbara all the time. It is not my name. Now Barbara is a nice name - perfectly respectable - just not my name. I have no idea why people insist on calling me Barbara. I even had a student that I have been teaching once a month for 8 months now call me Barbara last week. So I figured my "twin" should be called Barbara.


I had to operate on her so I have split her ribs. I was going to buy the Fantastic Fit system and had actually ordered it - however the order didn't go through so I don't know whether to buy it now or just pad her with wadding from Spotlight. It is the waiting that will kill me!

I also need to work out how to use the hemmy thingy.


Here she is wearing one of my RTW dresses/


I have been told I can't use her until my birthday which is still a few weeks away. And OF COURSE I will not use her until my birthday - I WILL have to pad her out then test the padding by testing a pattern or two on her - just to make sure it all works of course!


Progress on the red dress:

I have sewed the front and back fabric and lining but haven't put it together. I am trying to work out how to do it and make it work. I have looked at a few tutorials on lining a sleeveless dress but I need to ponder it a bit more. I really miss my sewing teacher!

I have also realised why we need pressing aids. I watched the Palmer Pletch DVD on jacket making and they have all of these pressing tools. I though - NAH - all you need is an iron and a board - but jeeze I could have used the tailors ham and the seam roll for the bust and darts and seams. So I may just need to order them.

Does anyone else use hams and rolls or do you just do with the board?
Until next time.

Saturday 11 February 2012

Weekend planning S4014; B5430 and PP Magic Pencil Skirt

Well I spent the day getting ready to sew tomorrow. I cut out both the fabric and the lining for my red dress (Simplicity 4014) and am ready to start sewing tomorrow.


I had already done a FBA - my first ever - and sewn a muslin.


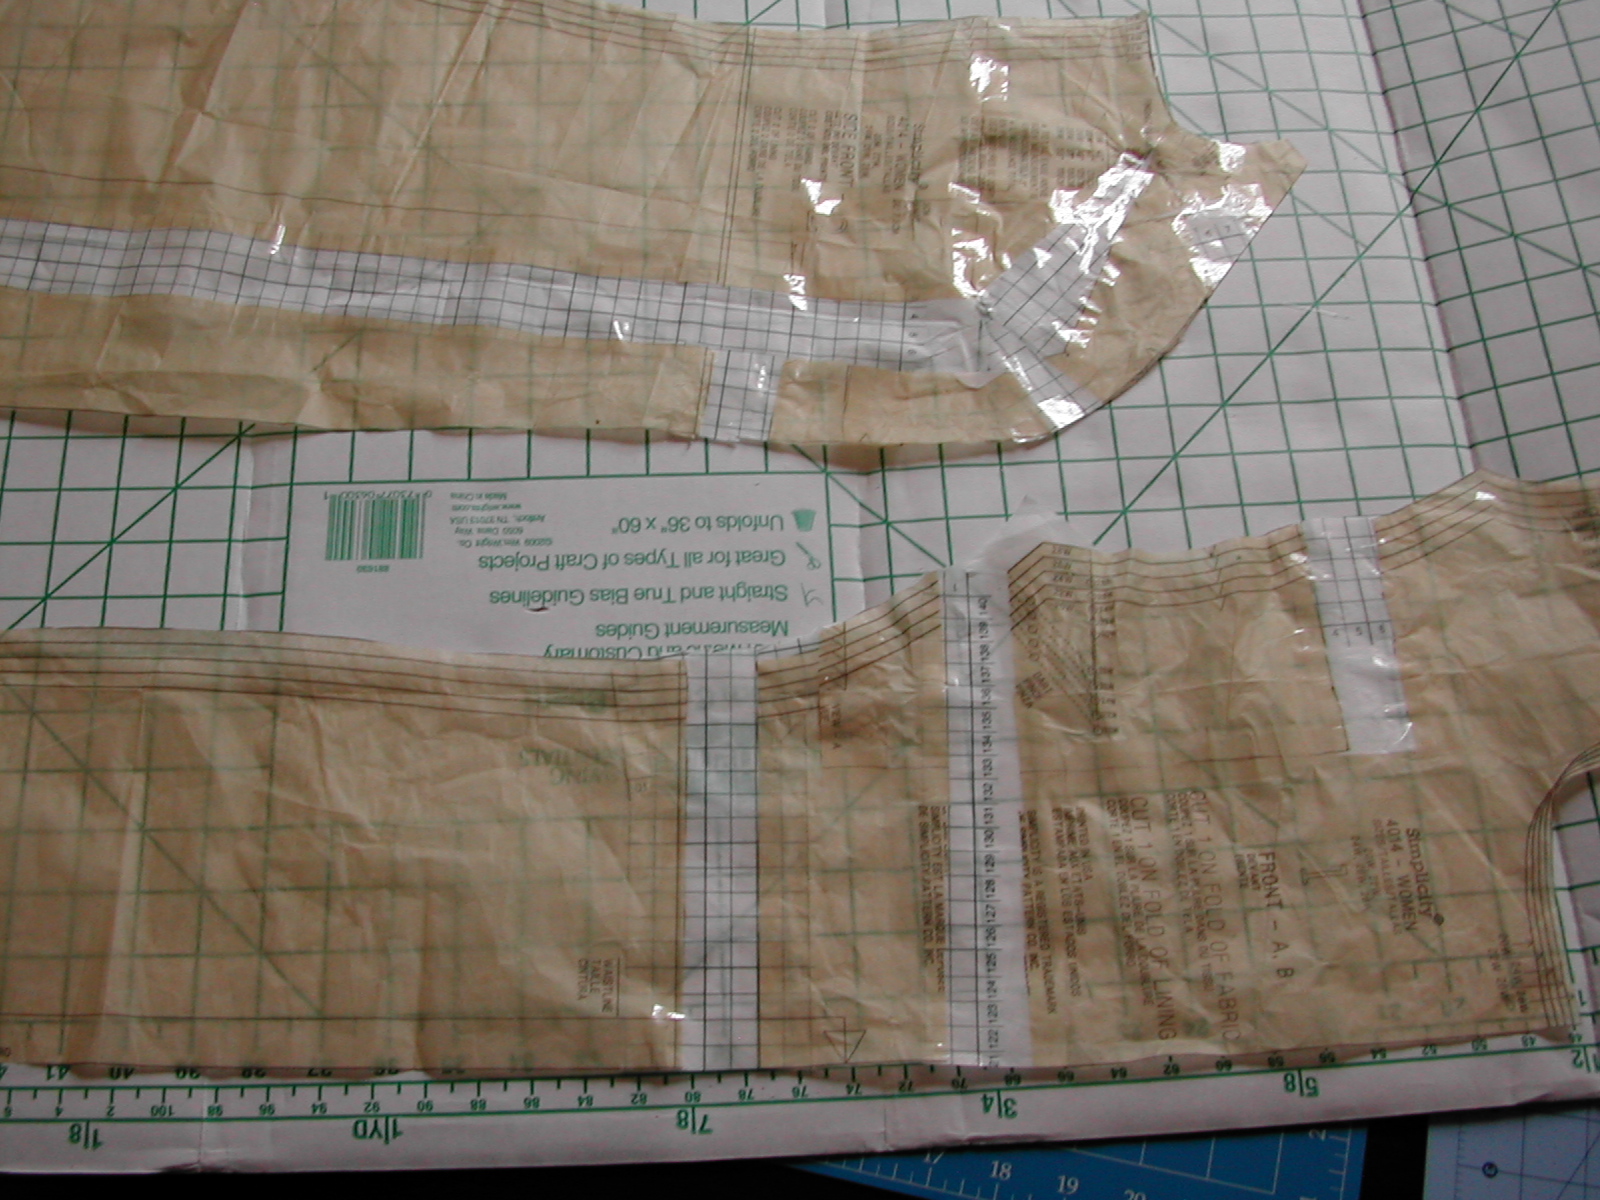
The dress I chose is quite confusing. I did a paper fitting which made me decide to lower the bust line an inch and add a couple of inches in the FBA..... the problem was .... and I only found this out after I sewed the muslin .... is this is not your usual run of the mill princess seam dress (as this is only my third garment sewn I don't really know what a run of the mill anything is but .......). When I did my paper fitting and my adjustments I did it for when the princess seams fall over the apex of the bust. But this dress does not do that. It was quite confusing as the seams run down the SIDE of the bust. I almost added an inch to the side and subtracted from the middle but then I thought - hang on - if I did that the darts would not be right!! Soooo ... my FBA was a little off as it really wasn't measured from the right place.. Have a look at the line drawing, you can see the darts are on the princess seams not the side seams:

I have decided to do the sleeveless version - I know I know - my wobbly bits will show - but my idea is to wear different jackets / shrugs etc with it and don't want the bulk of the fabric.

Anyway - by taking some off the shoulders I think I can put everything back in its right place - time will tell how it ends up.

My big problem is - how to sew the lining in. Will I do a separate lining and sew it in or will I treat lining and fabric as one and sew it as I go... I will sleep on it.

This is my fabric and lining:


Wool Blend

Charmeuse


I also traced the pattern for Butterick 5430.


Ponte knit Berry
Now I am normally a cut the paper patttern kind of gal. Quicker the better I say... however I think that I can quickly become a convert to tracing the pattern first. What do you prefer? I thought I can morph this pattern from smaller shoulders to fuller bust and tum..... well .... didn't pick an easy one to do that with as it has yokes and back parts and cowly neck etc - NOT straight forward as to what is bust - what is shoulder etc. Will wait and see how this turns out. This will be a muslin but I hope it turns out wearable. I am really finding out what many others have said - take your time - get the pattern right. I am trying.


I also traced Pamela's Patterns Magic Pencil Skirt. I am dying to try this pattern (although I had to add 5 inches - it is funny - just typing this out I have realised that I added 5 inches to the pattern instead of dividing that by 4 as it is a half pattern cut on the fold - which means I have added 20 inches - DOH! Oh well - at least I didn't cut the fabric.


Ponte Knit Black
I had some nice comments from the hectic eclectic (love the name) MrsC. I had to look up SWAP when I first read it in reviews as I thought similiar to you - swapping things - but it didn't go with the sentence LOL. Re the legs - thanks - sometimes I wonder how they hold the rest of me up. I look forward to seeing Burda phase II and your storage solutions.

Re the dressmakers dummy - DOH - it was just ordered and paid for on Friday. On the hopefully positive side - I purchased the fabulous fit system so I am hoping to pad the dummy up to my voluptuous curves so hopefully it will work. Any comments out there re fabulous fit?

I will post tomorrow a *hopefully* finished dress.

Sunday 5 February 2012

Using scanners and OneNote

I have had a couple of questions regarding using OneNote for older patterns that you can not access through the net, using OneNote to catalogue magazine articles and using cataloguing patterns to be able to find them easily so I thought I would scan a pattern in to show you how it goes in.

I have scanned the below pattern using my scanner and then copying the resulting pictures and pasting into OneNote.

You can see that I have typed in V119 DKNY Cowl Neck Dress - As you type in the title it automatically names the tab for that page the same (on the right hand side of the screen) I have also put it in a separate category - scanned - although I could have put it straight onto a new page in dresses.


This is the back of the pattern scanned in.


As for cataloguing the patterns - I have put them under Wardrobe, Dresses, Skirts, Tops, Jackets, Slacks, Casual, Accessories. You can see the category tabs on the top of the screen. You can make your own decisions - you might file them under brand - Simplicity etc, or Season - Summer / Winter etc - whatever you think will help you to find them. As you put them in the title of the page automatically comes in from the website (unless you scan it). I usually change the title to have the pattern number first - below it is B5719 and then that is reflected on the page tab on the right hand side of the screen.

As you click on the page tab it moves to that page. You can see the tab of the page that is active is white - not blue. 

You can manually move the pages to put them in order if you want. Unfortunately I have not found a way to automatically sort them. I haven't bothered putting them in order. They are put in the order that they were imported from the web.


You can download a trial of office 10 to give it a try - if you do, just make sure the package you download has OneNote.

Good luck.

Wednesday 1 February 2012

More on OneNote

I have been following a discussion on PR about fabric Apps and I am posting this to show some more functions of OneNote so if you are not interested in OneNote - Read no further.

I must tell all who are looking at apps for fabric more about why I love OneNote.


I have been reading that some applications don't allow for multiple views etc.

I have added a couple more pictures to show how easy it is to use OneNote.


Here I have right clicked on a website and chose - send to onenote,
It opens this dialogue box saying select location - here I have selected - In the crosshairs (fabric) which is a page I set up for fabrics I like and might buy (fabric fever again)


As you can see here - it put the whole page in - put in a title for the page and labeled the tab (at the bottom of the list in pink)- I have done nothing at this stage


Here I highlight what I want to delete and just press delete. I "clean up the page" only takes about 30 seconds.


This is what I end up with. Even better at the bottom of the page it puts a link in for where the page was inserted from - so if I do want to purchase it I click on the link and if the fabric is still available it will go straight there. So you end up with all info - width of fabric, washing instructions etc - as long as it was on the website - all at one click and a bit of cleaning. Very quick and efficient.


I can then copy and paste any pictures I want and this is helpful to see what fabrics go with what patterns and match in colours.


Then you just open One Note app on your phone and it automatically syncs - don't even need to plug it in. This app is free. They also have an upgrade which costs money but I haven't tried that one yet. Don't know how it can be improved? Maybe it pays for your purchases ;-)


AND - you can use it for whatever you want - not just fabrics and patterns. Here I have opened a cookbook and downloaded recipes. Would be good for any planning - holiday, weddings, etc. It even has dowloadable templates for wedding and home improvements. A great all rounder.